Virtualization, technology, and random rantings with a focus on Citrix and VMware.

Category: Linux

You Are On The Not Allowed List! Get That Outta Here! : Geo-IP Blocking With Responder Policy

Update coming for a process to do a weekly update of the CSV files from MaxMind to use more current files than the included ones in the ADC firmware.

So you have some compliance you need to meet on your IRS1075. You might see one of those points that you have to restrict based on origin country IP. Well… That can be a little bit of fun (note below on how that can be fun). So you will need to logon to your ADC with your super secret squirrel account to change the laws of access. For this, I would recommend using the all powerful command line. There is a link to a CTX article that explains parts of this https://support.citrix.com/article/CTX130701/how-to-use-netscaler-to-block-access-to-a-website-using-a-location-database-based-on-users-country

In this example, I’m using Ubuntu on WSL for that Windows / Linux immersive experience.

Login to ADC with SSH.

This is using the inbuilt csv that is part of the firmware that is in the ADC from firmware 11.0. You can use an external file as well which is outlined in the CTX130701 article.

Enter in “add locationFile “/var/netscaler/inbuilt_db/Citrix_Netscaler_InBuilt_GeoIP_DB.csv””

Hit enter and it will report “Done.”

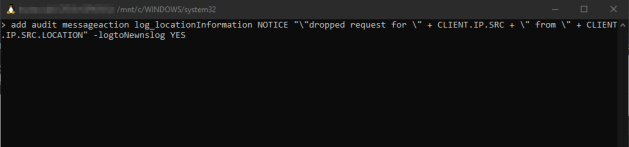
Enter in “add audit messageaction log_locationInformation NOTICE “\”dropped request for \” + CLIENT.IP.SRC + \” from \” + CLIENT.IP.SRC.LOCATION” -logtoNewnslog YES”

This will create the audit log that you can associate to the Responder Policy to write out to whatever syslog you are using.

Enter “add responder policy Drop_non_US_IRS1075 “CLIENT.IP.SRC.MATCHES_LOCATION(\”.US....\”).NOT && CLIENT.IP.SRC.MATCHES_LOCATION(\”.CA....\”).NOT && CLIENT.IP.SRC.IN_SUBNET(10.0.0.0/8).NOT && CLIENT.IP.SRC.IN_SUBNET(172.16.0.0/12).NOT && CLIENT.IP.SRC.IN_SUBNET(192.168.0.0/16).NOT” DROP -logAction log_locationInformation”

This will allow all USA and Canada IPs, and the private addresses for the internal users. If you leave that part off, well…. they aren’t gonna connect internally. This is assuming you want to allow all the private internal IP ranges. You can narrow that further if you wish to be more restrictive. **this is note referenced above**

Enter “set locationParameter -matchWildcardtoany YES” This is for NetScaler 11.1 build 53.11 and above. This is referenced in the CTX article.

Enter “show locationparameter” and it will show the loaded csv file and the “Match wildcard qualifier to any: YES”

You have the audit log configured and the Responder Policy configured. You will need to now bind it to your vservers to apply the policy.

Enter “bind lb vserver <vservername> -policyName Drop_non_US_IRS1075 -priority 100”

I would definitely recommend testing this on an internal testing site so as not to break your production environment. Happy restricting!

Change That Deprecated HTTP.REQ.USER

Get rid of it! In the How To Create The Wow nFactor part one (https://xenapplepie.com/2022/03/13/how-to-create-the-wow-nfactor/), there is a section where you get a popup after configuring your LDAPS authentication. This outlines resolving that by logging into your handy, dandy Netscaler ADC with the power of SSH or putty. I’ll also link from that location the changes listed here to resolve that. This example will use putty as getting in the door. After that point of connection, the commands are the same from an SSH session.

Open up Putty and enter the host name / IP.

Login with your nsroot privilege.

Enter “shell” to drop to the Linux shell.

At the prompt, enter “cd /nsconfig/loginschema/LoginSchema.”

Press “Enter.”

Enter “ls” to list folder contents. You are looking for the PrefilUserFromExpr.xml file.

Enter “cp PrefilUserFromExpr.xml /nsconfig/loginschema/PrefilUserFromExpraaa.xml.” You can change the file name to whatever you wish. I just used this name for the example. This copies the xml file that is the template for the xml file you are going to modify.

Press “Enter.”

Type “cd..” to go up a folder level.

Type “ls” to list folder contents. This is to confirm the file copied correctly.

Type “vi PrefilFromUserExpraaa.xml.” This will open the file in vi editor so that you can make changes to the file.

Press “Enter.”

Use your arrow keys to navigate to the ${http.req.user.name}.

Highlight the first “h.”

Press the “Del” key to delete the text until you have just “{}.”

Press the “i” key to “Insert” and enter “AAA.USER.NAME” in the area so that it looks like ${AAA.USER.NAME}.

Press the “Esc” key and enter “:w!” This will write the file.

Press the “Esc” key and enter “:q” This will quit the vi session.

Type “exit” and press “Enter.” This exits the shell session.

Type “exit” and press “Enter.” This will exit your putty session.

Now you will need to go back to the section for the LDAP schema in your nFactor flow and edit. You will choose the LDAPS_Auth_Test Login Schema.

Click “Edit.”

Click the pencil icon.

Click on the “PrefilFromUserExpraaa.xml.”

Click “Select.” If you do not do this part, you won’t see the change reflected. You will see the ${AAA.USER.NAME} in the “User name” field.

Click “OK.”

Click “Done.”

You have completed the change to the custom XML file to move from the deprecated setting!

Rocky Road Or Mint Alma?

https://arstechnica.com/gadgets/2021/06/centos-replacement-distro-rocky-linuxs-first-general-release-is-out/

Looks like the new CentOS replacement is hitting the road running! Hopefully will get to take it for a test drive soon and see how it plays. If you haven’t been to Arstechnica, what is wrong with you?! You need that in your life!

The Kernel, Sans 11 Herbs And Spices

Looks like the new 5.11 linux kernel has been released! Look at the article below for more information!

Linux Kernel 5.11 Released With Support for Wi-Fi 6E, RTX ‘Ampere’ GPUs, Intel Iris Xe and More

More Power From The Warp Cores!

We need more power from the warp core! Captain, I’m givin her all she’s got! Ran across something interesting. Something that I should have thought of before but for some reason, I did not. Windows default power management usually is set for balance even on servers. Didn’t think about it being something similar on Linux distros. It appears that is the case! So…… What I found in an issue with some lag and latency, is that Ubuntu and some other distros use ondemand as a CPU scaling governor as the default power scheme. There are a lot of write-ups on the various scaling governor settings available, so I won’t go into all of those. I will show how to set it to performance. I found that CentOS has this as well, but I am working on how to get it set to performance and will add that here as soon as I get the howto on that. This becomes applicable for your Linux VDI that you could be supporting in your Citrix VDI environment and could run into audio issues or are experience lag with multi-core systems.

So here is the way to set the scaling governor to performance on Ubuntu systems. There are two ways depending on if you are running older than 18.04 or newer than 18.04.

For 18.04 Ubuntu and newer:

Open console and type “cat /sys/devices/system/cpu/cpu*/cpufreq/scaling_governor” to see what it is set to. If it is set to “ondeman,” it is governing the procs. To change to “performance,” type “echo performance > /sys/devices/system/cpu/cpu0/cpufreq/scaling_governor.” To confirm the change, type “cat /sys/devices/system/cpu/cpu*/cpufreq/scaling_governor” to make sure it is showing performance.

For earlier than 18.04 Ubuntu: (from https://itectec.com/ubuntu/ubuntu-how-to-set-performance-instead-of-powersave-as-default/)

Open nano or vi and edit /etc/rc.local and insert these lines before the last line containing exit 0:

sleep 120 # Give CPU startup routines time to settle.
cpupower frequency-set --governor performance

Happy computing with thy VDI! I’ll post the change for CentOS / RedHat when I have the settings available!

LinuxVDA’s Excellent Adventure!

There’s something afoot at the Circle K… So I’m sure you’ve had some fun getting the Linux VDA to work on XenApp 7.15LTSR or the newer 1906.2 pr 1909. Well…… it is a bit of a challenge. I have had some difficulties myself. It kind of felt like nailing Jell-O to a tree or lighting a flameproof candle. But…. I did manage to get it working. There are some caveats to this though. I have only been able to get it to work with Winbind and if there isn’t a define UPN set in the AD profile for the user. I’m working to resolve the issues with SSSD, then it would support the UPNs.

However, on with the show!

First off, you need to get a base install of CentOS 7.6 with Server GUI option ticked on the install. After the base install, you will have to get some files downloaded and ready to install.

(https://drive.google.com/open?id=1IFqZKOstw_mxKiSD5hcrS_uhZp2UOMGa)

I just happened to upload the files that you need to get it all sorted and working.

After you have the base install finished, you will need to do the needful with the steps below. The order matters as there are dependencies. You can follow the step-by-step in the Citrix Easy Install for the start of the setup and make sure to select Winbind for this one. As soon as I get SSSD working, then I will post the update to this.(https://docs.citrix.com/en-us/linux-virtual-delivery-agent/current-release/installation-overview/easy-install.html)

Here are the steps!

  1. Install LinuxVDA with (sudo yum localinstall -y LinuxVDA-1903.el7_x.rpm).
  2. Run the install script from /opt/Citrix/VDA/sbin/ (sudo ./opt/Citrix/VDA/sbin/ctxinstall.sh) *if you run into issue, use cd /opt/Citrix/VDA/sbin/ and then enter sudo ./ctxinstall.sh*
  3. Install webkitgtk with (sudo yum localinstall -y webkitgtk-2.4.9-1.2.x86_64.rpm)
  4. Install ICA client with (sudo yum localinstall -y ICAClient-rhel-19.3.0.5-0.x86_64.rpm).
  5. Copy over .pem files to /opt/Citrix/ICAClient/keystore/cacerts (sudo cp /home/user/Downloads/entrust_g2_ca.pem /opt/Citrix/ICAClient/keystore/cacerts) and /opt/Citrix/ICAClient/keystore/intcerts (sudo cp /home/user/Downloads/entrust_l1k.pem /opt/Citrix/ICAClient/keystore/intcerts). *only if you are using Entrust certs*
  6. Run (sudo ./opt/Citrix/ICAClient/util/ctx_rehash) to apply cert. * if you run into issue, use cd /opt/Citrix/VDA/ICAClient/util and then enter sudo ./ctx_rehash*
  7. Copy over color.pkla to /etc/polkit-1/localauthority/50-local.d/ (sudo cp /home/user/Downloads/color.pkla /etc/polkit-1/localauthority/50-local.d/)
  8. Setup machine catalog and delivery group on Citrix Studio.
  9. Go back to Linux machine and enter sudo shutdown -r now to reboot.

With that, you now have the words of Rufus and the code for time travel plugged in. Be excellent to each other!

Not Working Fedora 29 to 5 – Updated!

Hello and good morning. These are the adventures of the starship…. wait. That’s right. Wrong channel. Wrong show.

So….. I decided to upgraded to Fedora 29 ( really really nice btw) at the end of October. Everything was hunky and even dory one would say. Except for something. Something very painful. I tried to use my Citrix Receiver to connect. And what happened pray tell? It wouldn’t connect. Some people have had success with loading additional libraries and finagling around to get it working. I have not as of yet. I’m waiting for a new release of the Linux Receiver instead of battling this one. I’ve seen on some forums that this is a common issue with Fedora and the receiver. So you may want to hold out on upgrading to Fedora 29 until this issue is resolved.

Update 03/27/19 – Instead of fighting the battle of waiting and fighting, I have skipped past fixing this for now and went the way of HTML5 client. Looks like a viable option for this! I’ll be posting about the HTML5 client soon!

Linux Receiver for Fedora

So you want to connect to Citrix on Fedora 28 to a Citrix site that uses Entrust certificates? Well, the receiver has a few issues with that idea. So to take care of that, there are some workarounds you need to do. I have a link on the bottom of the screen for what I had to do to get it working. You will need to download the tarball files. I used the 13.8 client. You can do it with the newer 13.9 as well, I had just backtracked to get it working. So below is what I had to do.

  1. Download the tarball to install https://www.citrix.com/downloads/citrix-receiver/linux/receiver-for-linux-latest.html. You will need to sign up for a Citrix account.
  2. Copy the file to /opt.
  3. Switch to the privileged user install.
  4. Follow the install through.
  5. When you are done, go to https://www.entrust.com and download the Entrust root 2048, Entrust root G2, and in my case, the Entrust L1K certificate. You may have a different intermediate certificate depending on what you are using. You will need to save these to /opt/Citrix/ICAClient/keystore/cacerts. I didn’t need the PEM, I only had to download the .cer files.
  6. You should be able to connect and launch now!

From I was finding, this is also what you will need to do if you are using newer versions of Ubuntu such as 18.04.

https://discussions.citrix.com/topic/393904-cannot-connect-to-0002-streetsmart-edge/

Powered by WordPress & Theme by Anders Norén